Puzzle Design and Signposting

The Puzzle Design

The Campsite Door puzzle is the last puzzle that faces the player in our short Endora’s Box demo. I wanted to challenge my design skills for this one, so the solution to this puzzle is actually based on a joke. My goal was to see if I could take a solution that is unintuitive and present it in a way that’s still fair and interesting to solve by using good signposting. As this game is designed around subversion, I wanted to build up to this huge and impressive conclusion, but have the reality be something much smaller and insignificant.

Goals:

  • Take a seemingly insignificant object (tin can) and make it seem incredibly important, without explaining why, or even stating that it is important.
  • I wanted the players to experience a moment of “Oh, I get it now, that’s funny” on completion.
  • I wanted to avoid the players resorting to brute forcing the combination.
  • I wanted to avoid the player solving the puzzle, but not understanding why.

The Mechanics

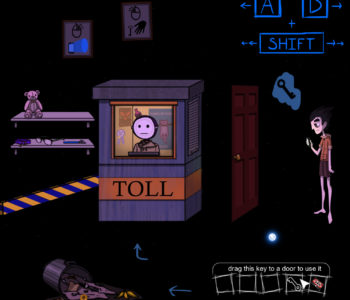
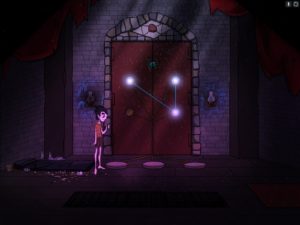
The puzzle involves a door that has a set of five orbs that can be touched. When touched, a line is drawn between them. There are also three plates on the ground that when stepped on by the player, will switch the orbs between three saved sets. In a pivotal meeting with the games mysterious antagonist Bugaboo, he mentions that the path is blocked by a difficult test and gives you a single object to help: a tin can. The core concept of the puzzle is that all of the drawings on the door need to spell out CAN.

Testing the concept:


Starting with a paper prototype, I sat testers down with only a few instructions:

  • I will stop you when you’ve completed the puzzle.
  • The coin represents you, you can move it along the arrow.
  • The squares represent floor switches
  • The CAN is an item in your inventory. You can use it on anything in the screen by placing it where you want to use it.
  • You can draw a single, unbroken line through any of the circles in the door frame. The line may not touch the same circle twice.
  • Simon is a character that you can talk to.
  • The Trash is for discarding items.

I explained nothing further, so the testers could discover the other rules through interaction. As a test mediator, here are the rules I followed:

  • When the testers moved the coin to another square in the arrow, I would switch door between the three copies, making sure that the first door always corresponded with the first floor switch and so on.
  • When one of the drawn lines touched the same orb twice, I would erase the entire line.
  • When using the CAN on the trash, Simon, the Door, or the floor switches, I would place a piece of paper on the board for the appropriate text, such as “This item CAN not be discarded”, or “This is a CAN”. I needed to do this instead of reading the lines to test the effect of spelling CAN in all capital letters to build suspicion of its importance.

Test Results:

After seven tests with people of different gaming experience, I found that everyone knew that the can was important, but very few could figure out why.
Only one person solved the puzzle because they understood the connection between the three symbols input into the door, and the three letters of “CAN”. Because of the low completion rate of my test, I realized that I could not rely only on the connection between “CAN” and the three input symbols.

Refined Design:

For my revision, I designed a three paths of clues to reach the puzzle conclusion:
Logic: Use the blacklight to see the hidden hint lines over the input orbs. These lines are an overlay of all three solutions put on top of each other. Using this new hint, a player can logically rule out 3 possible connections between 4 of the 5 orbs.
Exploration: Three notebook pages can be found that show the solution to the puzzle. The notes aren’t all hidden in plain sight however, and won’t necessarily be in order when picked up. One of them is found on the floor near the door and is labeled as “Note 2/3” to show that it is only a third of the solution, and more exploration may reveal the other two notes.
Humor: Several hints are given that the can object is important. When trying to discard the can, it is not discarded. Instead, text appears saying “This item CAN not be discarded”. Looking closely at the can or the three notes, it is labeled with text drawn in the same five point style as the door, even with the extra line protruding from the tip of the N. Any time the can is referred to in game, it is spelled in capital letters (CAN) to draw attention to the shape of the letters, which are the solution to the door. Players who see the importance of the word “CAN”, and who also notice there are three symbols needed for the door, may enter the word to see if it works.

Getting Familiar:

Another trick I used, is to remove one orb from the puzzle so that the player knows it can’t be completed, but is allowed to play around and get familiar with how it works. The most important part of this change is that the player starts on the left side of the room, and must walk over all three floor switches to progress to the room on the right where they are given the CAN. When they step on the switches, they will see that the door changes between the three sets. To further illustrate that there are in fact three separate symbols, each one already has an incorrect drawing set when you arrive to the room. With these changed alone I’ve already explained how the puzzle works to the player, without even one word spoken.

Designing A Successful Tutorial

Some general tutorial goals

  • Players don’t like to be told what to do. Give them clues and let them figure it out and they will learn much better.
  • Every step of the the tutorial should teach more than one thing. Time is valuable, so cram as much learning in as you can and get into the game.
  • Make the tutorial engaging. I chose an empty void to reduce distractions, but also because it ties closely into the narrative of being absorbed by Endora’s Box and entering a strange new world. It is also designed to resemble regaining consciousness, and when it’s over, you’re not sure if it really happened or not.
  • Let the player dictate the pace through interaction. The only part of the tutorial that the player can’t control is a few lines of dialog with the gatekeeper. I kept this to an absolute minimum so new players get the hints they need, but returning players don’t sit through a wall of explanation.
  • Review your basics! Most gamers consider WASD and arrow keys to be obvious methods of movement, but you should not skimp out of teaching any of your core interaction methods. Point and click is the basis of most interactions in Endora’s Box, so it was critical that I spend some time to solidify that as a type of interaction before introducing more unique concepts.

Designing the tutorial took a few tries, much user testing and plenty of review

Initial testing of the game revealed two major reoccurring problems:

  • Over half of players forgot to keep using the black light after leaving the tutorial. They would get to a new room, miss all of the hidden black light clues and think: “Nothing here! Must have missed something in an earlier room.” before proceeding to backtrack.
  • Players rarely showed items to characters, even when out of other options. All characters have unique dialog to provide small hints about each object shown to them to guide the player in the right direction. The ducks, for example require you to complete a recipe to make them ‘food’, without specifying what food item they want. Some components of the recipe are indeed ‘food’, but when giving these items to the ducks, they will explain why they do not want that, and berate you about following the recipe, which hints that you should go back and actually complete the recipe.

Here are the  solutions to these problems that I’ve included in the final tutorial:

  1. It is very difficult to complete the tutorial without using the black light (it teaches the player walking controls, but even if the player had figured those out on their own, the black light also reveals the key to the door that prevents progression, and also reveals the light switch that reveals the door that exits the tutorial)
  2. The room directly after the tutorial will AGAIN require you to use the black light. If you have forgotten how to use it by this point, Bugaboo (a helpful reoccurring NPC) will offhandedly remind you to use your black light after talking to him a few times.
  3. The next room and many later rooms have permanent black-light sources that constantly partially reveal the hidden text to remind players to keep using their black light in every room.

Teaching in an order that builds new knowledge off of each point

To be able to teach effectively, you need to know what information is prerequisite to each other piece of information. Using the inventory system as an example, the player must know that they can click on things before they can click and drag inventory items. As a designer, the best way to get this information was testing different tutorial iterations with my target audience and noting where people stumbled. After about three different designs, here is the order that worked best:

1: Things can be clicked, and  the mouse will change to a pointer hand when things can be clicked.

2: Items can be collected (optional how to read environment objects).

3: Black light can reveal hidden things.

4: WASD or arrow keys to walk, hold shift to run, and helpful hints can be hidden in black light.

5: Reinforce pickup items, black light can hide required items.

6: Picked up items go into inventory, and mouse over inventory items for a description.

7: Drag items from inventory onto objects in world to use them, and when dragging items, a discard option appears.

8: You can give a character different items for different responses.

9: Black light reinforcement.

10: Recap of controls that can be revisited at any point.

A breakdown of each step:
While I highly recommend that you go play the tutorial for yourself to see how it feels (it’s free on GameJolt and other indie sites), I will also break it down step by step below.

1 and 2: The first thing you see is a blue orb, falling from the sky. It lands and the lights fade in to show a character getting up off the ground. A picture fades in that illustrates a mouse clicking the left button to pick up an item. With no instruction and nothing else to do, the player will mouse over the orb, which changes the cursor to a pointer hand, which is a cue to click, which collects the orb (See this post for full coverage of the design behind the ‘Context Cursor’ system).

3Another painting fades in with a simple illustration of a right mouse button being pressed and a blue light. The player can then right click and their black light is activated, after moving the mouse around they will discover blue arrows that are invisible outside of the radius of the black light. These arrows point to the instructions for how to move the protagonist using A and D to walk, and Shift to run.

4With further inspection, you’ll find arrows that point to the left, indicating that the player actually needs to move left instead of right.

5A trail of arrows will lead to a locked door that blocks the way. It is unlocked by an invisible key that can be revealed by using the black light. Once clicked, the key will fly into the player’s inventory.

6When mousing over the key, a description pops up. It says “Drag this key to a door to use it”.

7When dragging the key onto the door, it unlocks and disappears, allowing the player to pass

8: Further along, the Toll Keeper will stop the player. He states that you cannot pass until you’ve paid the toll. The player is likely to give Toll Keeper the Coin item (which is found nearby), assuming that the toll required to pass is money, but he will refuse it and hint that he only accepts items of sentimental value. When mousing over items in the inventory, the player will notice one is labeled “Your favorite mixtape”, the only object in their inventory that could have any sentimental value.

9: The end of the tutorial has the player run into an area with no lights. The small light emitting constantly from their phone will conveniently reveal a light switch once the player has run as far left as they can. This is a fail safe so they can see the light switch even if they are not using the black light like they should. Once the light is turned on, the tutorial is over, and the player is locked out of the tutorial area for good. The only way out is a door in the now small closet that the player stands in.

10All of the controls are repeated in the background of this area so the player can re-visit here for help.

Other design fun facts:

The tutorial is purposefully designed to make the player walk from right to left, this not only helps with the jarring atmosphere of the narrative, but subvert’s the player’s expectations of a traditional left to right level. A large gate is placed just to the right of where the player wakes up to play into this expectation, but when clicked it explains that it is locked permanently.